.jpg)
|
Having removed the old '76
frame and cutting it up in pieces for
hauling to the dump, the '82 frame is
ready to accept the body. |
.jpg)
|
The critical clearance
area with the motor's rear crossmember
was at the A/C housing. It's a real
close fit - about 1/8" clearance. I may
do some minor grinding on the housing so
that as the body-mount bushings age and
compress there is still some clearance. |
|
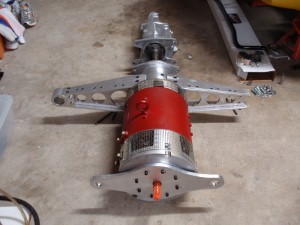
These pictures aren't in
order. Here's an old fitting of the
motor's rear crossmember to make sure
everything is goes together. |
.jpg)
|
The '82 frame uses a
different transmission crossmember. The
'76 required minor modifications where
it bolts to the frame.
The shift is generic BW/Muncie. It was a
good price - especially knowing that I
would have to modify it. |
|
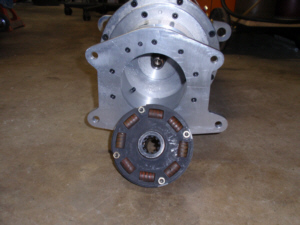
I'm not a believer in
directly mounting the motor to the
transmission so I made a hub that uses a
RAM spring damper/coupler. My concern
was minor motor pulsations resonating
throughout the car. |
 (300x225).jpg)
|
I wanted the motor as low
as possible (due to the clearance at the
A/C housing), but I was limited by the
steering drag link. At full steering
lock, there is about 1/2 clearance.
These parts are rock solid so running
them tighter would not have been a
problem - until the idler arm has 75,000
miles on it! |
 (300x225).jpg)
|
How do you fill a
one-gallon bucket with with two-gallons
of water?
I bought
twenty-four Odyssey PC1500 batteries
with the belief I could somehow cram
them into the car.
With a lot of creative mounting, I've
shoe-horned them in with ample space for
accessories - like an antenna for the
new radio! |
 (300x225).jpg)
|
The Corvette dash borders on trash.
The only good things are the speedometer
and tachometer.
The console is also antiquated so it too
will be trashed.
I was going to keep some of the
wiring from the old gauge cluster, but
eventually canned that idea. |
 (300x225).jpg)
|
The dash pad, while new,
is only going to be used as a template -
vinyl is vinyl, even when it has
"stitching" accents! |
 (300x225).jpg)
|
Here's the full
drivetrain. At the top of the picture
are the tubular upper control arms - not
necessary, but the price was right. |
 (300x225).jpg)
|
Another shot of the wiring
and some items that will be part of the
instrument cluster and console. |
 (300x225).jpg)
|
After hours of looking for
the "SAE" specifications for electric
car charging connector, I eventually
came upon that elusive hardware.
While I won't need the CAN
bus, etc., they at least look
correct.
|

.jpg)

.jpg)
.jpg)
.jpg)
.jpg)
.jpg)
.jpg)